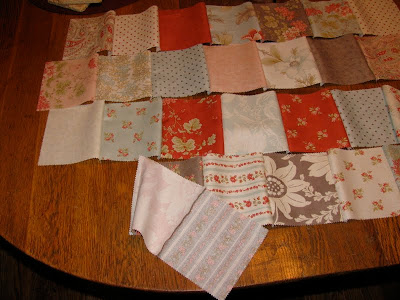
I am in major stash-buster mode, Friends. As far as I’m concerned, I would crash my stash once a day. Yeah right! Like I have time for that.
Searching around the web, I checked one of our fave sites – All Free Sewing! They compile free patterns from all over the blogosphere. Personally, I think their website is a little lack-luster, but the content is great and it’s really easy to use.
I love it even more now that I can scour the site and save things I like to the WOM-MOM Pinterest site. If you haven’t heard of Pinterest, which you might not have yet since it’s fairly new, you should do it, stat. As in right now.
One of the things I pinned was a patchwork sewing machine cover, here. I’ve been wanting to do something for my sewing machine since I got it for my birthday last year. (Remember, I was on a 1-year craft ban in 2010, but it ended a little early when I got my sewing machine.) Really, there’s no harm in any crafts so long as I spend next to nothing to do them – I already have a pretty good-sized stash of craft and sewing stuff.
So this sewing machine cover looked fairly easy, and this weekend I was itching for an evening craft I could do. I pretty much just read through the pattern I pinned, then made it up from there using my own stash supplies (used what I have!) and tweaks.
FABRIC: I had a charm pack left over from a previous craft project. Charm packs are snazzy little stacks of coordinating 5” square fabrics. There are multiple, complementary colors, all cut and stacked, ready to sew. There are a lot of projects out there that call for a charm pack. As I recall, I spent about $8-10 on my charm pack, which is nice for the variety of fabric I got, and it’s Moda, which is a nice brand of quilt-shop fabric.
 |
| My original Moda 'Martinique' charm pack project - little cutie holds sewing implements (I have many!) |
I used a white patterned fabric for the backing and ties (you can only see the pattern up close) that I got on clearance at Mill End Textiles before it closed in my area – already in the stash! The lady in the tutorial used ribbons, but I decided I wanted something with strength – so I made ties out of that same white fabric. Eight 12-inch long ribbons or fabric ties – you pick.
SEWING: I did 7 squares by 4 squares for my fabric. I laid out the squares in a pattern I liked (balancing the light and dark colors) and sewed the rows of 7 together into strips. For seam allowance, I usually follow the outside of my presser foot, which is 3/8”. ¼” seam allowance would be fine too.
Before sewing the strips together to make one patchwork top, iron each seam of the strips open so that it lays as smoothly as possible. Then sew the four strips together, and iron each of those seams open too.
 |
| Seams ironed open and prepped Pin the squares at the seam together as I sew the strips together so the corners line up. |
I took the measurements of my fabric top and cut an equal-sized piece of the white backing fabric.
At this you will be ready to assemble. Place the patchwork top over the top of your sewing machine and mark where the ties should go. Pin them onto the GOOD side of the patchwork top, with the unfinished end sticking off the edge of the top’s edge slightly and the finished end pointing inward. The tie strips will lay INSIDE as you sew the good side of your patchwork top to the good side of the backing fabric.
Pin the backing fabric to the patchwork top, good sides facing each other, and sew all the way around the edge (I again used the outside of my machine’s foot), leaving about a 3” gap on one of the shorter sides. This hole is for turning.
Trim the corners off of each of the four corners – but don’t cut through the stitching! This will make nice sharp corners when you turn the top right-side-out. Use a pencil eraser tip or your finger to push the corners to as nice of a square point as you can.
Iron the fabric piece nice and flat, making sure you pull out the seams to the max, and iron the pieces of the open seam so they lay nicely – you will topstitch around the entire outside of the top and the hole will be closed up then. Do this topstitching as close to the edge of the piece as you can.
That’s it.
Now this is a rather simplistic version of a cover. Its sides are still open, and it doesn’t have an opening at the top for my handle. I keep my regular plastic cover on it still (the thin plastic one that came with my machine), then this nice fabric one on top. My machine is super protected now. Once I have a house with its own sewing-craft room, a handle-less cover won’t matter because it will always get to sit out on its own table. I dream.


No comments:
Post a Comment