January 31, 2012

VALENTINE TOWELS!

DAY ONE

Posted by Lori~

It’s February and that means that our 10 days of LOVE series is kicking off.  Ethne and I adore Valentine’s Day and the sweetness it brings.  You see we both feel blessed to have QUALITY husbands (more on this later), but we feel it is appropriate to spend 10 days on all thinks RED!

And so, we will kick-start the series with a craft!  OF COURSE IT IS THRIFTY AND EASY TO MAKE!  You will LOVE IT!

I am “stealing” this idea from a blog that I follow.  You can read all about it here.

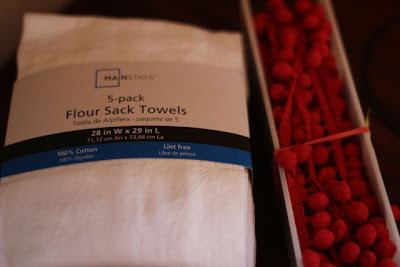
All you need for supplies are dishtowels.  I purchased the white cotton flour-sack kind.  And you need pom-pom trim.  I selected RED for the season.  (I unfortunately do not have a Joanne’s Fabrics in my little city, ND town, so no coupon for this purchase…however, most craft stores will carry this product and with a coupon…EVEN BETTER!).


It’s super easy…simply sew the trim along the edge of the dishtowel and there you have it!  (you can decide how many edges to sew.  I opted to sew ONLY along the bottom edge; however you could do more).  I folded them into groupings and tied them with red and white ribbon (already had on hand).


Mur-Man helped me while I sewed (and insisted on wearing swim trunks!)


SUPER AFFORDALBE!  SUPER ADORABLE!  And the perfect gift.  


January 30, 2012

PERSONALIZED THANK YOU CARD!


Posted by Lori~

I was writing up my Christmas and birthday thank you cards (for Mur-Man) and told Steve I needed something creative.  And yes…when he is older he will be doing this.  (My folks instilled the importance of thank you and I hope to pass this onto Mur-Man).  Now I just need to get better about my thank you efficiency!

The best part was I had the perfect photo from our Disney World vacation….And I told Steve to give Mur-Man a talkin’ bubble.


PERFECTION!  And we printed them four to a page on white card-stock (which we coincidentally had on hand).  Totally FREE and totally adorable. 

Mur-Man can say "thank you" or "happy birthday" and the back has
plenty of space for a personalized message!
And the best part is that this card can be used FOR EVERYTHING!  Next up…a card with Mur-Man featuring yours truly!

January 29, 2012

CORK NECKLACE!

Posted by Ethne~

My co-worker KA ran across this awesome cork necklace at a store in big city, MN, a while back and, naturally, she clued me in STAT.  You know from here and here and here how much Shaun and I like to do stuff with our massive collection of wine corks.  I might not wear it to work every day, but it is totally worthy of my ‘going out’ collection (clothes and jewelry I only wear when Shaun and I go out – who wants to wear work clothes or weekend duds when you are out to dinner, clubbing or having cocktails?  Not moi.)

I made my way over to the store (Good Things) and took a couple of pictures.  I knew instantly that I would be able to re-create it.  The Good Things necklace cost $29.95.  Not too bad, but I set out to make myself a necklace for far less than that.


There is a GREAT bead store near my house called ‘Garden of Beads’.  Their selection is huge and fairly economical on the whole.  There is an exception to this: good metals, specialty items or if you make things on a large scale and need spendy products and tools, it adds up – like just about any craft.  (JoAnn has a smaller selection but is probably less expensive for some of the beads.)

The key is to shop around.  Buy from JoAnn if you can – they often have lots of sales on jewelry-making supplies and all of their bead stuff is fairly economical.  You’ll need a rounded tip pliers, a regular, fine-tip pliers, a metal nipper and accessories such as headpins and jumprings – this is for general jewelry-making.
Jump ring - opening at top
jump ring open

For this project, you’ll also need two washers with a small center opening (go to the hardware store) and two small eye screws (hardware store).  Take a cork with you so you can make sure the washers aren’t too big.  I used gorilla super glue to adhere the washer to the cork and to put on the screw threads before screwing it into the cork.  Total cost: less than $1 not including the super glue which I already had.

eye screws
The washer has a small opening

For the beads, I chose a ceramic bead from Garden of Beads that reminded me a lot of what the sample necklace looked like.  Cost: $3.50.  I wanted a bead/charm that had a word on it, and I settled on ‘laugh’ since it’s my favorite thing to do.  Cost: $1.50 at JoAnn.  I added a third dangle of sparkly bluish beads for some glam.  I already had the headpin and beads, but they would cost a buck or two to purchase.


I had to buy the round jumprings to hold on the ceramic bead to the eye screw.  The Garden of Bead lady sold them in packages for about $2 and she recommended I use two for extra strength.  And lots leftover.

Lastly, I wanted the metal ‘dogchain’ type of chain, like the sample necklace.  The shiny silver I bought was $6 per foot and I bought 2 feet.  Gulp.  I like the shiny silver, so I am fine with the purchase, but I think any more necklaces I make will use the 2’ stainless steel version at JoAnn for $1.50.

Shiny

My necklace cost about $15 to make (I factored in that some of my supplies will be usable for other things and some of my beads I already had), but if you get the more economical (and virtually identical) chain from JoAnn, the price is dramatically less than the original $29 necklace.

Here are some pictures of how I assembled it all:


Isn’t it cute?  And THRIFTY?  It would make a great gift and you could totally specialize it by using a cork from a special bottle of wine (like the bottle you drank the night you got engaged or, if a gift, from a bottle of wine or champagne which was used for toasting at a friend’s wedding).

January 26, 2012

GENDER REVEAL PARTY!

Posted by Lori~
My fabulous co-worker and WOM-MOM follower Krysten recently attended a gender reveal party.  I have been hearing more and more about these parties and have been seeing TONS of ideas on Pinterest.
Yes, Steve and I were bound and determined to know the sex of my Mur-Man and found out at 16 weeks!  CRAZY…I KNOW!  It was like…lookout world (legs spread)…I AM A BOY!  And we didn’t even think to have a party!  Or better yet…have others surprise us.
You see…at this party the new mom and dad didn’t even know.  They simply handed an envelope with the gender to a friend…she made cupcakes and filled these cupcakes with either blue/pink frosting.


BLUE IT WAS!  What a genius idea!  The possibilities for these parties are ENDLESS!


The guests were asked to wear the "color" they believed to be the gender!
WOM-MOM contributor Steph did something similar, but had a Niece reveal/read the sex of the baby.  EVERYONE WAS SURPRISED INCLUDING MOM/DAD!
And no…I am not preggers….YET!  But I am thinking about it and thinking about the gender revealing possibilities.  I saw this idea on Pinterest and loved it!

Gender in a box.  Click here for details.

January 25, 2012

CLEANING WITH MEL: Ammonia De-greaser!

Posted by Ethne~

Hey Dudes.  (Remember the show 'Hey Dude' on Nickelodeon when we were kids?  I just thought of that for the first time in like 2 decades.  I digress.)

We helped my bro and sis, Rich and Mel, move into their new FIRST house last Saturday.  I am super excited for them.  As in totally crazy jealous and at the same time genuinely thrilled.  They got a GREAT house and it has some genius features like a spice cabinet alongside the Jenn-Air stove/oven and almost all of the kitchen cupboards have pull-out shelves and drawers.  And heated bathroom floors.  Holla!

Happy Homeowners!

Naturally Mel is Queen Organization so by the time it came to moving on Saturday, we got the men doing the big furniture and then she and I sorted, assembled and organized drawers and such.  By Sunday, they were completely unpacked, put away, and had cleaned and turned in the key to their apartment.  That girl is CRAZY!  In a pretty cool way.  As in I will be delegating my next move entirely to Mel.

So since Mel is fully unpacked, she now has nothing better to do than pack for Mexico and scour Pinterest for ways to mega-clean her new house.  Here is one such example...

"Hi Wom-Mom followers.  I was so excited about my newest household tip that I kind of hinted to Ethne that it should be a blog post.  My intent was that she would write it.  But you know Ethne, always so savvy…she now has me doing her dirty work!  Speaking of dirty work.  Look at this before oven grate and see how sparkly they can become.


Before on the right: Grime City!

Recently my husband, Rich and I bought our first home (recent, like 1 week ago).  We are absolutely thrilled and could not be more excited.  My only complaint was that the previous owners did not treat my Jenn-Air Stove very nicely.  I mean really people!  Most people that enjoy cooking would kill for a Jenn-Air restaurant-quality stove that is both conventional and convection oven (gas & electric) and gas stove top. (Or at least they would sell their first born!)  Clearly the previous owners had no love in their hearts for “Jenni” so it was left to me to get her sparkling again.  {EDITOR'S NOTE: I won't be satisfied until Mel has named something totally cool after me.  Hand mixers and other such small appliances do not qualify.}

That’s where www.pinterest.com came in.  Here is the original sight I found my new tip on http://workmanfamily.typepad.com/our_life/
If you don’t want to waste time looking at the site (there’s a lot of extra nothing on there), here’s what I did.  Take a Ziploc bag (the site recommended a gallon bag.  My grates were on steroids so I had to use a Ziploc Big Bag (size XL).  I simply put the grate into the bag then added the magic.  The magic being . . . ¼ cup of ammonia.  Don’t be scared folks.  Ammonia is fine if you don’t sit and inhale it for long periods of time and mix it with other chemicals.  Plus it is only $1.19 at Target.  I also had a $.50 off coupon for the Target Up & Up brand.  Grand total: $.69.   And you read correctly, only ¼ cup.  It’s the fumes that do the work not the liquid, but it is ok for the grates to touch the liquid. 

So, you should now have your grate in the Ziploc with ¼ cup of ammonia.  Seal the deal and let it sit for a long time.  I checked at 12 hours and nothing happened.  This caused feelings of defeat.  Fortunately, I was too busy to deal with it at the time so I just stuck the grate back in the bag and left it.  When I finally remembered, it was at about 36 hours later.  I found lots of black crud floating in the bag.  I instantly got excited and thought, “Yay it worked!”  Then I realized, “Oh Crap!  That may be the paint peeling off!”

That wasn't paint peeling off - look at the gunk that came off!

All I had to do was rinse the grate off.  I had to use a washcloth in some of the corners but it took no scrubbing at all.  So simple and cheap!"


THRIFTY + CLEAN = WOM-necessity

Needless to say, these pictures show the before and after results are a success in the cleaning department.  The other 3 grates are already fuming as I type this.  I hope you find this tip helpful when trying to maintain your stove which should be both functional and beautiful.  “Jenni” is no longer ashamed of her exterior!"

January 24, 2012

POTTY TRAINING…STEP 1 COMPLETE!

Posted by Lori~

It arrived today….the toilet insert potty seat.  And guess what…it was FREE!  That’s right…I had enough Pampers points to score the Diego potty insert for FREE!


I thought I might have better luck going this route, because this is what the daycare uses.  It came….Mur-Man sat on it. And of course, did nothing.

Not so sure

I let it go.  And then it was tubby time.  He sat on it and nothing happened.  Then he went into the tub and said he needed to get out and go potty.  Again..nothing happened.

Seems happy to sit on the big boy toilet.


But the third time was the ticket.  He asked to get out of the tub and a few minutes later I heard a tinkle.  He did it.  He peed in the toilet!  And we had a MAJOR CELEBRATION!

That's pee in there!!!! 
Major accomplishment…Now we have to keep going.  

TIP: Toss your plastic wrap

Posted by Ethne~

I am here to tell you about one of the best kitchen products.  And...no matter how many people I personally advise about this, I am shocked at how many are resistant.  It's ridiculous.  You'll see why.

The product...[drum roll]...Glad Press-n-Seal.  Seriously, Friends, if you haven't tried it yet, or if you know me already and you are fighting me about using it, get with it!  It is so awesome.


Press-n-Seal is slightly thicker than standard plastic wrap.  The benefit - it doesn't stick to itself when you try to rip a sheet off of the roll.  It will stick to itself, technically, but it can be separated without ripping or ruining the sheet.  That right there justifies the purchase. 

In addition, it's got one side that is slightly sticky, so the wrap will securely hold on when you wrap it around a dish or food item.  And it's resealable, so you can stick and re-stick it a few times.  Easily worth the purchase.


The price isn't ridiculous; equal to or hardly more than the standard plastic wrap, so no arguments about its THRIFTY VALUE.  I haven't seen a generic version in any of my regular stores, but I'd probably stick with Glad anyway as a thank you for their invention.

I couldn't be a legit blogger if I failed to inform you of such brilliant inventions, so there you go.  You're welcome. *Glad did not give us any kick-backs or swag for this post - tho if they gave us a shout out on their website, we'd be very appreciative.*

January 23, 2012

RETRO PLATES

Posted by Lori~

Steve’s mom likes to save lots of things…in particular, mementos from Steve’s childhood.  Recently, she has been doing a clean out of these items and has been bringing them to our house.  (My mom does the same thing.  Now that we have a house, we get to store it).

But going through the items is a lot of fun.  She recently brought some paper plates from Steve’s many birthday parties.  And they are AWESOME!


Pretty sure this is Optimus Prime!

This was the first movie that I watched at the movie theater!  The memories!
I saw them and I knew immediately, they were a MUST for Mur-Man’s room.  What I will do with them is still a mystery.  I am asking you WOMS for advice.
My FAVORITE!  This one will look the BEST in his room!
I did recently look through Pinterest and found this idea as inspiration.

Click here.
WOMS…what do you think?  Any ideas?  Please make suggestions.  I do promise to give an update when the project is complete.

January 22, 2012

RECIPE: Cauliflower Mashed Potatoes!

Posted by Ethne~

I made one of my favorite vegetable dishes tonight - cauliflower mashed potatoes. 


Remember from here where I talked about making baby food modeled after Jessica Seinfeld's book, Deceptively Delicious?  Well, I've made purees since then for all sorts of uses, like beets and sweet potatoes for pancakes; peas and spinach for smoothies; and homemade applesauce, skins and all.  My girls eat it all - they don't know the difference.


This smoothie was made from beets, berries, kefir (homemade yogurt) and OJ
beet puree
kefir


I mixed up this idea with a dish you can eat on Atkins/South Beach diets.  I did the South Beach diet before I got married and I have to say, it was great.  Besides pregnancy weight gain, I've never gained the weight back I lost on that diet.  Breastfeeding dropped my weight even further.  (ROCK THAT S**T!)  The dish: cauliflower mashed potatoes.  No potatoes are harmed in the making of this dish - it's all cauliflower!


I use the whole head of cauliflower


So I cut a cauliflower head up into florets and steamed it (it took three batches to steam it all - the Ziploc steamer bags and my food processor can only handle so much at a time).  The steamer bags cook the cauliflower florets perfectly in 4 minutes.


sweet steamin'


I dump the steamed florets directly into my food processor and whirred it up.  I stopped after 1 minute and scraped the sides down with a spatula.  The consistency was still slightly coarse (like grains of kosher salt) so I added a little (about 2 tablespoons) water and whirred it again for another minute.  This left me with a nice, mashed potato consistency.


Before water: see the coarse consistency at the top edge of the bowl?
after water: smooth just like mashed potatoes, huh?


I froze 2/3rds of the cauliflower plain (in 2 separate packages) for future use.  The third portion I used for dinner tonite.  To up the flavor, I added some butter, salt, milk (in place of the water, same amount), pepper and parmesan cheese.  I whirred it into the consistency of mashed potatoes and served it up.  Let me tell you it's DELICIOUS.


my plate: baked fish, brown rice with spinach and cauliflower mashed potatoes - NUMMY


The girls don't know they aren't eating real mashed potatoes and I feel totally WOMTASTIC feeding my kids a great cruciform vegetable - cauliflower is in the same family as broccoli which = cancer fighter!
KD posing
Easy Mac not so much into a fancy pose