
Lori and I have been so excited to reveal these projects, and we
wanted to do this a few days earlier, to go with the first day of the Summer
Pinterest Project reveal on Tuesday, but we had to wait…these projects are for
a SURPRISE SHOWER (we even gave it code initials – SS) for one of our our best
friends, Grizz, who is expecting her first child in November. We are thrilled for her – and we knew we
couldn’t dare chance to ruin the surprise because she is one of our most LOYAL
Wom-Mom followers and reads the blog every day.
If she saw the post any time before the SS on Friday, the gig would be
up!
 |
| Lori, me and mom-to-be Grizz at Girls Trip last year - so exciting! |
 |
| TC (she's preggers too!) and Steph |
Luckily for us, this weekend is Girls Trip (!!!) and we are going
to throw her the SS for brunch today – since we couldn’t wait any longer
anyway!! If planning goes well, and
hopefully with a little help from Shaun and Steve, this post will go up
simultaneously, and will also be linked up with our fave blog Younghouselove
so we can share the love with a whole bunch of you! Check the link to all of the Pinterest
Challenge Projects on their blog here.
So these were the projects that Lori and I did. We had so many more ideas, we just couldn’t
get them all in. For the most part we
used items we already had in our stash; we only purchased a few new things.
Wubbanub
My girls and Mur-Man all loved Soothie pacifiers best of all. I didn’t know about Wubbanub pacis till after
the girls didn’t use them anymore, but Mur-Man
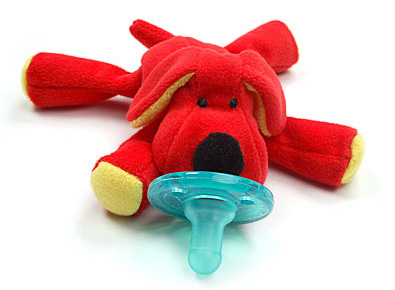 Well, I knew I could make it.
As with many kids, the girls get way more stuffed animals than they can
ever play with. When these dogs I used came
into our house, I sneakily pulled them aside, knowing exactly what I wanted to
do with them (we have two dogs of course, like we have two of everything). They are super lightweight, are that velvety
soft material, their bodies lay flat and they have a seam across their mouths
making it easy to insert the paci.
Well, I knew I could make it.
As with many kids, the girls get way more stuffed animals than they can
ever play with. When these dogs I used came
into our house, I sneakily pulled them aside, knowing exactly what I wanted to
do with them (we have two dogs of course, like we have two of everything). They are super lightweight, are that velvety
soft material, their bodies lay flat and they have a seam across their mouths
making it easy to insert the paci.
What I didn’t know is how I would attach the pacifier to the
dog. I asked Lori and Steve and they
said to use heavy-duty thread. I only
had heavy black thread, so I went to Joann and bought some Sulky clear
thread, which was on sale for 50% off - $1.99!
I purchased a 2-pack of Soothie pacifiers (which are made by Avent
evidently, but we got all of ours at the hospital when they were born) at
Walgreens for about $3.
I used a thin needle and one piece of thread (not double) and
seam-ripped open the mouth of the dog, slightly bigger than the size of the
pacifier ‘handle’. The handle should be
inserted at the bottom center, meaning the majority of the pacifier should be
above the dog’s mouth. I shoved the tip
of the handle into the mouth opening and sewed the fabric mouth closed around
the handle. I then shoved the handle
into the mouth further so that the mouth puckered around the handle more and
sewed the mouth closed around the handle again at this point. I had debated gluing the tip of the paci
handle into the open dog mouth before sewing it in, but I didn’t want to risk
any glue toxins harming Grizz’s baby. So
I decided to double-sew the paci into the mouth instead. Also, sewing the paci further into the dog’s
mouth means that it is not flopping around in her mouth, it’s really stable.


I have never sewed a pacifier before, so I do not know how long it
will hold up, but I hope that Baby H will get some good use out of it. The double-sewing should help it to
last.


Finally, Since Baby H is a girl, the dog needs to be a girl too,
so I sewed a pink bow on one of her ears.
I purchased some Stop Fraying glue at Joann (with a 50% off coupon) to
keep the edges from getting frazzled after much use.

As for cleaning, the dog can be washed in the washer on the gentle
cycle (preferably in a garment bag) and air dried. The pacifier can be sterilized by holding the
pacifier portion into a pot of boiling water for 1-2 minutes.
Princess Picture
I fished around from Grizz if she and her hubby had decided on a
baby name yet, since we could have so much fun crafting with that
information. They aren’t sharing. Ahhhh!
But she did tell us what baby’s nursery colors are: pink and brown. Lucky for me, I found perfect match
scrapbook paper for $0.20 at Joann and a 5”x7” canvas for $3 (50% off).
I knew just what I wanted to do with it. On Pinterest I had pinned (it wasn't from a blog, so I can't credit anybody) a little piece of
art that says: “Not everyone can be a Princess…Someone must clap as I pass
by.” This is just PERFECT. So this Sunday I got out the good old Mod
Podge, some decorative items like glitter gems, pink flowers, ribbon, and the
wax seal stuff from my wedding invitations (7 years ago!!).
First I laid the scrapbook page facedown on my table, and then put
the canvas facedown on that. Holding the
canvas down and steady, I folded the scrapbook page around the edges of the
canvas almost like I was wrapping a present, and made creases. I then cut around the outermost crease – this
is the size of paper that I needed to wrap the white of the canvas.
I applied a layer of Mod Podge with a cheap black sponge brush
over the entire face of the canvas. I
then layed this down onto the center of the back
side of the scrapbook paper. Now flip it
over and smooth out wrinkles and air pockets as best you can. You are applying paper onto fabric with glue,
so it’s not going to be perfect, but the nice thing about Mod Podge is it will
smooth out once it is fully dry – not 100%, but 90%.
Now flip the canvas back over and on one of the 5” sides, apply a
layer of Mod Podge onto the canvas portion and fold up the paper, smoothing it
as best you can. Hold it there for a few
moments. Do the same for the other 5”
side.
Turn now to one 7” side.
Apply Mod Podge to the canvas as before and fold up the sides, holding
for a moment. As you do this, crimp the
corners to a crisp point where they stick out, and fold them inwards. Mod Podge is like glue, so you can apply some
into the crease of the paper to help it stick together. I then folded the corner points inward onto
the 7” sides. Do the same for the other
7” side.

Lay the canvas on its back.
Smooth the paper out again onto the face of the canvas. Be careful not to tear it because the Mod
Podge will be soaking into it.
Basically, press out creases and air bubbles as best you can. Now with your brush, apply a liberal, but not
gloppy layer of Mod Podge over the face of the canvas. I like it all to go one direction, from left
to right. Do this also for the sides so
that everything is coated with Mod Podge.
Make sure that the turned-down corners of paper on the 7” sides are
pressed down really well now since this is the point you are sealing them. Don’t worry that the paper is really clouded
over – Mod Podge dries clear!

Wait until the Mod Podge is no longer tacky – it doesn’t have to
be 100% dry – an hour should do. You can
now apply whatever else you’d like.
While I waited, I printed up my lettering for the quote, and tore
the edges around it so they looked rough like an old-fashioned scroll. I tied a little ribbon and found some
coordinating ribbon flowers. I found
some clear crystals and a piece of lace for hanging the artwork on Baby Hintz’s
bedroom wall. And I had Shaun melt some
shimmery white sealing wax from our wedding onto wax paper and stamped a
fleur-de-lis onto it. I thought this
would be a nice royal flourish.
Once the canvas was ready for its next layer, I Mod Podged the
lettering onto the piece, which just took a few minutes, and let it dry again.


Finally, I applied the embellishments and hanging lace ribbon with
my glue gun. DONE! HOW EASY?! Isn’t it
the cutest thing ever? I have some extra
supplies from this project which I’m thankful for because I can think of a few
other princesses who need this plaque!
Burp Rags
For Lori’s baby shower, she got these great homemade flannel burp
rags from a good friend. And if you
scour Pinterest as we did for projects for Grizz (our other GT bffs Steph and
TC did homemade gifts too, so we were all in on it – but I don’t have pics
of their projects yet, so we’ll post those next week) you can find lots of
ideas. But Lori and I decided we still
liked hers best of all. They are curved
like a kidney bean.

I didn’t have a pattern, so I just made one up. The pattern I made up is __” long and __”
wide at the center point. Then I just
cut it into a rounded bean shape. Easy
enough to make up. If you don’t feel
certain, just make it square. But the
bean shape is nice because it curves around your neck when you’re burping baby.
Important First Step: Wash
This is simple. Cut three
layers of your coordinating flannels. I
used what I had in the stash from when the girls were younger. Cut two pieces with the right side of the
fabric facing upward – these will be the top and middle layers. Cut one piece with the right side of the
fabric facing downward – this will be the bottom layer.
Sandwich all the layers together and pin them really well so they
don’t move around on you while you sew them.
Sew a straight line down the middle.
Sew all the way around the edge of the burp rag, leaving a ½” seam. Now snip the edges, about ¼” apart, being
careful not to cut your stitching though!
Wash again and the edges will get all fluffy.

Best burp rags ever!
Be on the lookout for part 2 (Lori's projects)....coming up next!
1 comment:
so crafty wom mom! Inspired me to make one!
Post a Comment