June 30, 2011

DOUBLE-HEADER FRIDAY: 25 CENTS SHOES LIKE NEW!

Posted by Lori~

I love thrift stores, and so when Steve and I have a little extra time on our travel adventures, I always insist we hit up the local thrift store.  Recently, I hit up a thrift store in Fergus Falls, MN and I picked up a pair of sandals for Mur-Man.  You see, these shoes were filthy, but I knew they had major potential.  And better yet, they were on “sale” in a thrift store.  TOTAL COST 25 CENTS!
The shoes BEFORE!


I brought them home and knew that they would need a major cleaning job, but I also knew they would look “like new” when I was done!  First up, I looked for my stash of Mr. Clean Magic Erasers (unfortunately, they were gone).  The erasers erase anything and everything.  But luckily I had Earth Brite.  This cleaning product also eliminates anything and everything.

I am always looking for ways to multi-task, so while I cleaned Mur-Man’s shoes…Mur-Man took a bath.  It worked perfect.
While Mur-Man's getting clean...the shoes are getting clean!
They turned out great (perfect for the lake) and better yet they cost me 25 cents!  ADORABLE AND AFFORDABLE!  NOTHINGS BETTER!
The shoes AFTER!  LIKE NEW!


ZIP LOCK BAG OMELETES

Posted by Lori~
Ethne and I follow lots of blogs---and there are several we LOVE!  One blog I recently discovered is the Beyer Beware blog.  She features a lot of great and easy recipes for a busy mom!  Ethne and I both love that.  One recipe that really interested me was making omelets in zip lock bags (that’s right and this means less dishes (AKA soaking pans)).

And so, I decided to try it (I hear this is popular recipe for camping, so consider it if you are headed out for July 4 weekend).  We weren’t camping, but thought let’s try it anyway.  I think doing this at home is a great idea too.

All you need is your typical omelet supplies (during our trial run we used eggs, fried bacon, cheese, mushrooms, onions, and green chili’s). 
FRIED BACON...It's a condiment in our house!

First up, you will want to mix up your eggs by whisking them well with a little milk or water.  Also prepare your omelet toppings by cutting, chopping, and/or frying.  It works best to set-up your table like a make-your-own omelet buffet. 

Cutting up onions.
Omelet ingredients!  YUMMMMYYY!
Using a large pot, boil your water. 

Each person can than “create” their omelet.  Pour into your zip lock bag (we used the sturdier freezer bag) your desired egg amount.  We would add about two cups of eggs per bag.  Then add your desired ingredients. 

Making my omelet!
Seal the bag and label (we used sharpies to label our omelets).  Then place them all (opening side up) in the boiling water.  Boil for around 15 minutes (or until done).
Ready to boil!

No omelet flipping required!
Serve!  SIMPLE!  EASY!  LESS MESS!  WHO COULD ASK FOR MORE? 

June 28, 2011

CRASH MY STASH: Sewing Machine Cover!

Posted by Ethne~

I am in major stash-buster mode, Friends.  As far as I’m concerned, I would crash my stash once a day.  Yeah right!  Like I have time for that.

In the car - always on the go.

Searching around the web, I checked one of our fave sites – All Free Sewing!  They compile free patterns from all over the blogosphere.  Personally, I think their website is a little lack-luster, but the content is great and it’s really easy to use.

I love it even more now that I can scour the site and save things I like to the WOM-MOM Pinterest site.  If you haven’t heard of Pinterest, which you might not have yet since it’s fairly new, you should do it, stat.  As in right now. 

One of the things I pinned was a patchwork sewing machine cover, here.  I’ve been wanting to do something for my sewing machine since I got it for my birthday last year.  (Remember, I was on a 1-year craft ban in 2010, but it ended a little early when I got my sewing machine.)  Really, there’s no harm in any crafts so long as I spend next to nothing to do them – I already have a pretty good-sized stash of craft and sewing stuff.

So this sewing machine cover looked fairly easy, and this weekend I was itching for an evening craft I could do.  I pretty much just read through the pattern I pinned, then made it up from there using my own stash supplies (used what I have!) and tweaks.

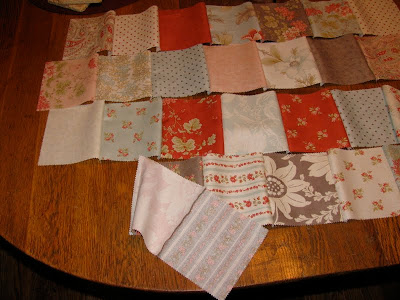
FABRIC: I had a charm pack left over from a previous craft project.  Charm packs are snazzy little stacks of coordinating 5” square fabrics.  There are multiple, complementary colors, all cut and stacked, ready to sew.  There are a lot of projects out there that call for a charm pack.  As I recall, I spent about $8-10 on my charm pack, which is nice for the variety of fabric I got, and it’s Moda, which is a nice brand of quilt-shop fabric.

My original Moda 'Martinique' charm pack project -
little cutie holds sewing implements (I have many!)

I used a white patterned fabric for the backing and ties (you can only see the pattern up close) that I got on clearance at Mill End Textiles before it closed in my area – already in the stash!  The lady in the tutorial used ribbons, but I decided I wanted something with strength – so I made ties out of that same white fabric.  Eight 12-inch long ribbons or fabric ties – you pick.

SEWING: I did 7 squares by 4 squares for my fabric.  I laid out the squares in a pattern I liked (balancing the light and dark colors) and sewed the rows of 7 together into strips.  For seam allowance, I usually follow the outside of my presser foot, which is 3/8”.  ¼” seam allowance would be fine too.


Singer Curvy can't wait for her new cover!

Strips of seven

Before sewing the strips together to make one patchwork top, iron each seam of the strips open so that it lays as smoothly as possible.  Then sew the four strips together, and iron each of those seams open too.

Seams ironed open and prepped
Pin the squares at the seam together as I sew the
strips together so the corners line up.

I took the measurements of my fabric top and cut an equal-sized piece of the white backing fabric.

At this you will be ready to assemble.  Place the patchwork top over the top of your sewing machine and mark where the ties should go.  Pin them onto the GOOD side of the patchwork top, with the unfinished end sticking off the edge of the top’s edge slightly and the finished end pointing inward.  The tie strips will lay INSIDE as you sew the good side of your patchwork top to the good side of the backing fabric.    

Pin the backing fabric to the patchwork top, good sides facing each other, and sew all the way around the edge (I again used the outside of my machine’s foot), leaving about a 3” gap on one of the shorter sides.  This hole is for turning.

Tie strips sewn in-between the top and bottom pieces -
the lengths of the strips are inside

Trim the corners off of each of the four corners – but don’t cut through the stitching!  This will make nice sharp corners when you turn the top right-side-out.  Use a pencil eraser tip or your finger to push the corners to as nice of a square point as you can.

Iron the fabric piece nice and flat, making sure you pull out the seams to the max, and iron the pieces of the open seam so they lay nicely – you will topstitch around the entire outside of the top and the hole will be closed up then.  Do this topstitching as close to the edge of the piece as you can.

Isn't she a beauty?

That’s it.

Now this is a rather simplistic version of a cover.  Its sides are still open, and it doesn’t have an opening at the top for my handle.  I keep my regular plastic cover on it still (the thin plastic one that came with my machine), then this nice fabric one on top.  My machine is super protected now.  Once I have a house with its own sewing-craft room, a handle-less cover won’t matter because it will always get to sit out on its own table.  I dream.

TUESDAYS AT NOON: Lori on…THE DOUBLE CHIN!

Posted by Lori~
You may have noticed that in some photos my body positioning isn’t completely natural.  Yes, I am that girl who will take photo after photo to ensure that my head is in the proper position to eliminate…..(drum roll)….the DOUBLE-CHIN!  I have it and I HATE IT!  On occasion I will even use my son’s head to hide my chin (it’s like Mur-Man is a prop).

I demanded we take this photo at least 10 times (or until my chin looks just right)
Ethne is blessed--no double-chin!
I always tell Ethne that if we strike it big someday with WOM-MOM, this double chin is gone!  Who knows…maybe we will be like Martha Stewart or maybe Nancy Grace (remember Women on a Mission:  Crime Edition), then I will have plastic surgery to eliminate my extra chin!  I HATE IT!

That was then (pre-double chin!)
This is now!  UNCONTROLLABLE DOUBLE-CHIN!
That's me dying on the wild thing roller coaster from the weekend!
I couldn't open my eyes!  NEVER AGAIN!  Notice--Steve LOVED it!
I do know that if I dropped a few pounds and QUANTUM LEAPED back to 1996...then my chin would go away.  But for that to happen major things have to occur!  And who knows…when that will happen! 
For now, I will have to continue to position my head and analyze each and every photo on wom-mom to ensure that my chin looks WOM-WORTHY!  Ethne knows…what can make the cut! 
I look forward to the day when I can proudly smile with no chin issue.  SOON IT WILL HAPPEN!  VERY SOON!

June 27, 2011

EZ GARDENING!

Posted by Lori~
We hit the farm a few weeks ago, and I am ALWAYS AMAZED BY THE HUGE GARDEN STEVE’S MOM GROWS!  IT IS HUGE and to me extremely daunting.   This summer, we are hoping to “plan” where our garden will go and get some grass seed planted (we actually put in a fence last summer and that tore up some of the lawn).  So next summer—garden here I come (but I assure you it will be about ¼ the size of Grandma Cher’s garden).

The garden goes on and on and on!


Strawberry plants!  We can't wait until they are ready!
One major problem with gardening is pulling weeds and of course, I am willing to do anything to eliminate weed pulling and make my garden as hassle free as possible. 
Cher has black fabric across most of her garden and cuts holes for plants.  She actually didn’t initially put down the black fabric (Steve’s Grandpa or Mur-Man’s Great Grandpa did) and the fabric is still there!  I AM AMAZED!  During the weekend visit, Steve, Mur-Man, and I assisted in the garden and it was slick! 
And to fill a hole, if you do not want a plant to grow, simply fill the hole with a square of fabric. 

No need to replace the fabric--just fill in the holes.
 This system doesn’t work as well for row veggies (like beans and carrots), but it works great for most plants. 

Look carefully--that is aspargus growing!  YUMMMMMYYY!
 Even Steve’s Aunt Patty and Uncle Joe sell this product and they SWEAR by it (yes, you can find similar products at home improvement and lawn care stores, but trust us...they are not the same).  I am SOLD!  EZ GARDENING HERE I COME! 


Uncle Joe did offer some advice…it is best if you plant your garden above the yard (or at a higher elevation) because the fabric allows the ground to store lots of water!  This will allow for run-off.  Also, because of the water saturation, do not over-water!  That sounds simple enough. 
Next summer, I will update you on my findings!  It sounds E-Z…doesn’t it?

June 26, 2011

MOUTHWATERING MONDAY: Homemade Mac N' Cheese!

Posted by Ethne~

My girls are big fans of mac n’ cheese.  I am too, truth be told.  The kind with the powdered yellow cheese powder is at the top of the list – I won’t deny I like Kraft too.  Ah, well, I thought it was about time we make it homestyle.

Steak not yet added, but yummy, huh?

I think I saw the general principle for this method on Rachael Ray’s show, but I’m not unfamiliar with making a roux (pronounced 'roo').  You use it to thicken sauces, make gravy (i.e., for fried green tomatoes – yes, I do that, it’s AWESOME, and you will learn when the tomatoes grow in Thrifty Nana’s garden), beer cheese soup and so on.

This is what you’ll need:

- One 8 oz. block of sharp cheddar cheese, shredded (or the equivalent of pre-shredded cheese – a little more cheese would be good, but don’t use less)
- About ½ to 1/3 cup milk, whatever % you have
- 2 T. butter (I always use unsalted – it’s totally pure that way)
- A sprinkle of flour, about 1-2 T. (I used whole wheat flour – I get a little whole grain in where I can)
- ½ cup of the pasta water
- Small pasta such as mini penne, mini bowtie or regular elbow macaroni (whole wheat pasta would be good too)
- Salt and pepper to taste

Shaun planned our steak grilling thinking this would take 30 minutes or more to make.  It came together faster than that.  I boiled the pasta in nice, salty water.  Be sure you always use a big pot and lots of water – pasta likes to swim (Thrifty Nana tip).  Cook till the pasta is the doneness you like; in the meantime grate your cheese.

Mount Cheese-uvius

Before straining the water off the pasta, take out the pasta water and reserve.  I always mix a little pasta water with my pasta sauces – somehow it always makes it perfect, no matter what kind of sauce you’re making.  The starches probably.

Toss the drained pasta with a drizzle of olive oil to keep it from sticking and clumping together.  Set it aside (put the lid on the pot so it stays warm while you make the sauce).

The sauce is easy.  Melt the 2 T. of butter in a frying pan over medium heat – don’t let it go any further than that so you don’t burn the butter. 

Butter - how can you go wrong?

Sprinkle in the flour and stir around until it turns into a thick paste.  Don’t let it go any further than that so you don’t burn the paste.  See a pattern?  This paste is called a roux.

Whole wheat flour slightly browned in butter - medium heat

Drizzle in the milk and stir around until it’s incorporated into the butter paste.  Sprinkle in a small handful of cheese at a time, and stir continuously until it’s creamy and melted; do this continuously until all of the cheese is fully melted.  I added the pasta water at this time and stirred it around until smooth again.

This is the roux
Stir continuously

Taste the sauce now.  Salt and pepper to your preference.

This is waaaay better than Velveeta

Stir the whole shebang together and done.  Isn’t that easy?  Now that you know this general principle, you can make just about anything – it is this same cheese-roux that is the basis for beer-cheese soup.  Yum.  If you want to go crazy, you could put the mac n' cheese into a greased casserole dish, top with cheese and bake for 20 minutes till browned on top.

So what was Easy Mac and KD’s reaction?  They wondered what it was since it wasn’t mac n’ cheese.  Well, pick your poison. 

MOM HEALTH TIP:  I’ve made this before and added ½-cup of butternut or other pureed squash to the cheese roux before mixing with the pasta.  This is a great way to sneak in a veggie, and since it’s pureed and yellow/orange in color, your kids won’t know the difference.  Pureed cauliflower would work too.

Enjoy Friends!  You should have a lot of fun with this recipe.  It really is superb.  And there is just some pride in being able to cook homemade mac n’ cheese.  No processed ANYTHING necessary. J

June 24, 2011

DOUBLE-HEADER FRIDAY: RIOT GIRLS: PRANKS!

Posted by Lori~
Yes, we were those girls…those giggly girls that thought anything and everything was funny.  I am still that girl who laughs at the MOST inappropriate times!  In high school, I would get the giggles mid-milk gulp at the kitchen table and would either have to spit my milk into the sink or have my milk fly out of my nose.  Ethne---is the SAME!  That’s why we fit!

8th grade band (notice Ethne in the red shorts)
Also, check-out the awesome sound-proof carpeted walls
Recently I was on a visit to my hometown of Williston, ND (Ethne and I have fond memories and feel lucky to have grown up there).  While there, my family and I made the important stop at Grandma Sharon’s restaurant for breakfast/lunch.  (You guessed it…they have FABULOUS RANCH AND BREWED ICED TEA!).

A family trip to Colorado--I'm the little one!
My brother was there, Steve, Mur-Man, mom, dad, and my nephew J.  Lisa, my sis, unfortunately had to work.  She recently got a job doing taxi dispatch from home.  You see—Williston is in the middle of a major oil boom and the city is FULL OF LIFE!  I had a plan…we MUST prank call my sister!  Lyle was the genius that knew how to turn off the caller ID and we knew he MUST make the call (my giggles would be a dead-giveaway).  I am not going to go into the specifics of that call, but let’s just say she totally bought it and it went on and on for quite some time.  My mom and dad both had tears rolling down their cheeks from laughing.  We couldn’t stop laughing and Lisa was a good sport.

My first Christmas
But, this prank made me think of other prank calls (people...this was pre-cell phone era).  I would get on a phone, Ethne would grab a phone, and most likely another friend would grab another phone and we would all listen in while someone dialed.  (I am by no means encouraging this behavior, but rioting is our specialty).  Our favorite number to dial was of course….. 1-800-tampons.  Yes, they had a help line and we came up with some pretty crazy questions (not even going there).  Basically the calls consisted of lots of rioting, lots of tears of laughter, and lots of fun.  Maybe that’s how I maintained my high school figure back in the day—so much laughing my belly hurt and my cheeks hurt! 

June 23, 2011

DOUBLE-HEADER FRIDAY: SURPRISE STREET SALES!

Posted by Ethne~

Thrifty Nana and I stumbled on a street sale at lunch today in little city, MN.  It was so great.  Reminded me of Midnight Madness in Williston all up and down Main Street around the 4th.  All the peddlers would tote their wares on the sidewalks.  It was pretty cool.

So what did we find?  Well, we were a little restricted on time, so we had to power street-shop, but we bought:

4 hanging hand towels (2/$5)

These towels won't keep falling off the oven door handle!

2 Barbie wedding dresses ($12 ea.) and 2 Barbie salsa dresses ($8 ea.).  The details on these dresses is AMAZING.  Do you even know how hard it is to sew those little teensy arm-holes?  Impossible, that’s how hard.  The lady is from the same big city, MN, that I am, and who knew?  

These have ruffly petticoats too
Imagine sewing in those teensy-weensy armholes

 
One lady had GREAT baby stuff, but since I’m not in the baby-supply shopping mode these days, I found her RE-USABLE Swiffer duster cloth for $2 a no-brainer.  I’ll try it out and maybe even try to make one.

Fleece-er duster

One of my favorite things is something I didn’t buy, but I might be able to make.  It’s a little pig made out of a small propane tank.  They made a giant one, too, out of an old metal milk can.  Thrifty Nana has one, of course, so maybe we’ll make a sow too, but I might start with the propane piglet.

I should’ve taken a picture, but didn’t cuz again, not in the market – but there was a guy there who hand-harvests hardwoods and makes them into staircases and other fine woodworks – he had two of his cradles on display: one was oak and one was black walnut.  They were GORGEOUS. 

A quirky older couple made garden flowers out of old colored glass cups, bowls and plates.  They were super cool, but a little out of my price range for garden stuff at $40, especially since I don’t have a yard yet.

What a fun treat my lunch date with Thrifty Nana turned into today!  You never know the little gems you’ll run across driving past a small town Main Street.  Don’t forget to stop!

PS – we also saw a kid activity that we’ll be copying for a party near you: bury a bunch of change in sand on the street and let the kids dig it out.  How great is that?  It’ll keep them occupied for AGES.  What WOM doesn’t need that sometimes!

Happy Summer, Friends!

NO SEW ROMAN SHADES!

Posted by Lori~
Our fabulous friend and follower Kirsti happens to be author of the blog Living in Lovely LaLaLand .  She asked us to do a guest post/tutorial on how to make no sew roman shades using plastic mini blinds. 


One of my shades in my living room (I have 6 matching in my living/dining area)
These shades are brilliant, super affordable, and require NO SEWING!  Click here to check it out.  And of course…consider following Kirsti’s blog!  Her style is divine!

June 22, 2011

TEA LESSON PART THREE: AFRICAN TEA!

Posted by Lori~

Both Steve and I work at a college in Little City, ND and we love it!  Recently we had a visit from a journalism student who just returned from Kenya.  Rhonnie’s trip was fascinating; she had lots of stories to share, and even kept us in the loop of all the trip happenings on her blog.  Check it out here.

Rhonnie bought this bag in Africa for ONLY $12.00
We grilled steak, made sweet potatoes (awesome recipe for a future post), and asparagus straight from Steve’s mom’s garden (YUMMMMMYYY).

Rhonnie brought the dessert and the tea (straight from Africa).  Dessert was coconut cookies. 
Rhonnie loves the coconut cookies!
Rhonnie explained how this had been their treat after a torturous hike up an African mountain.  Rhonnie is a KILLER spin class instructor…if she struggled to get up the mountain…I don’t even want to know how Ethne or I would do!  Quantum Leap here we come! 
Roger even liked the cookies!
Rhonnie brought Kenyan tea and served it the exact way it was served in Kenya. 

Fill your mug ¾ full of milk (Rhonnie brought 2% milk) and heat (we used the microwave). 

Add hot water (courtesy of our electric tea pot). 

Add a tea bag and let seep until done (your preference). 


Add sugar if you desire (pure sugar—substitute sweeteners will not do).  ENJOY!  WE DID!
Steve and Rhonnie toasting their African Tea!
Thank you Rhonnie for bringing a little African culture to our home and to WOM-MOM!  WOMs it is no secret that Ethne and I L.O.V.E. TEA!  MORE TEA MAKING TUTORIALS TO COME!